Knowledge of graphics and video editing software, at least at a basic level, is a very useful skill these days. Using graphics packages can greatly improve your work in a variety of positions.
Entrepreneurs can quickly and easily improve the visual representation of the brand they are promoting,
teachers can better adapt their teaching materials and make them more interactive,
university and college students can also use these tools to improve the quality of their projects or presentations.
These are just a few quick examples of the use of these tools. You would more or less find some use for them in most professions.
At Dogtronic we use a number of Adobe solutions on a daily basis to create content for both our own brand and to improve the visual SEO content of our clients’ brands. We use Adobe suite because it is very intuitive and if need be, you can very quickly learn how to use new tools without the need to find a specialist with years of experience.
Below we will show step by step one of the Adobe Premiere Pro features that can be used in simple promotional videos, informational videos, or animations. Step by step we will show how to get the effect of objects dynamically entering the screen.
What does it look like?
A dynamic transition, or basically an inlet of objects to the screen, is a simple and aesthetically pleasing procedure that can come in handy for a variety of treatments. From short presentations, to simple promotional animations and instructional videos.
You can see the end result here, and if that’s what you’re looking for, below we’ve prepared a simple tutorial for you to achieve a similar effect in your original content.
Krok 1
Project preparation
The first step to take is to determine what objects we want to insert into our animation. Depending on whether it will be:
text that we can prepare from scratch in Adobe Premiere Pro,
or a graphic element such as a logo, which we need to prepare a separate file,
we prepare the environment and export the necessary files. In our example, these will be:
Two lines of subtitles that we will prepare in Premiere Pro
Logo for Adobe Premiere Pro
Dogtronic logo
Importing graphic objects into Adobe Premiere Pro
To import objects or files into a project, we need to enable the import option. This can be done using the keyboard shortcut ⌘ + I (for Mac OS) or Ctrl + I (for Windows). Then select the files we need and press the Import button.
Importing files into a project in Adobe Premiere Pro
We then move the zimported files to the Workspace and adjust their final position relative to the screen and size.
Adjusting object size and position in Adobe Premiere Pro
Preparation of subtitles in Adobe Premiere Pro
We can add captions using the Typographic Tool (keyboard shortcut T).
Adding subtitles to the project in Adobe Premiere Pro
Next, we adjust the size, font, color, position (and whatever else we feel like and can do) of our captions. Editing options are available in the Essential Graphic window.
Editing subtitles in Adobe Premiere Pro
Krok 2
Animation of objects
When we have all the necessary objects prepared, we can move on to animating them.
Arranging objects in the Workspace
Let’s start by arranging the objects in the Workspace so that they appear in the animation in the correct order. For our project, we will use an interval of about 0.2 sec. between the appearance of each object.
Arranging objects in the Adobe Premiere Pro workspace
Animation of object motion
To put an object in motion, we must set its start and end positions. The final position is the position in which the object is currently located.
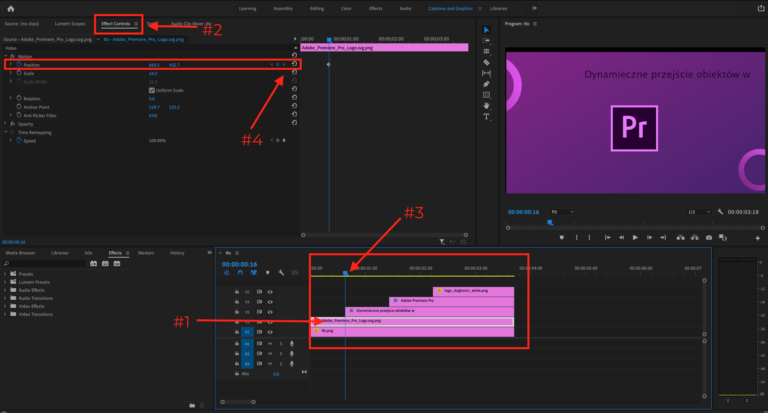
We will now set in motion the first element that appears in our simple animation-the Adobe Premiere Pro logo. To do this, we need to sequentially:
[#1] Select the object in the Workspace.
[#2] Navigate to the Effect Controls window.
[#3] Mark the point in the animation where the object reaches its final position.
[#4] Mark this location as a key point for the Object Position, without changing its value.
Animating object movement in Adobe Premiere Pro - step 1
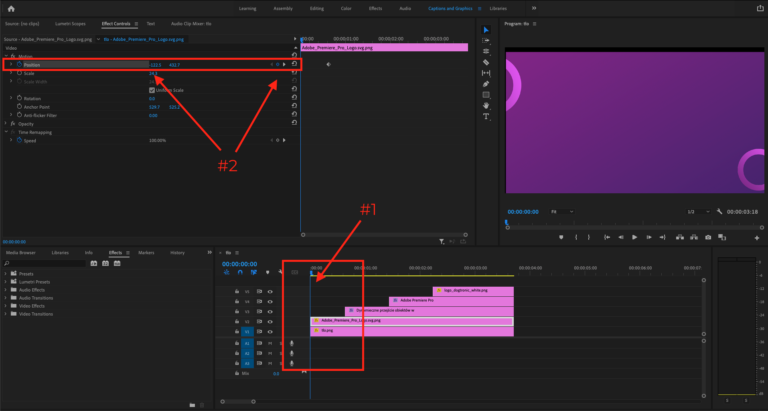
Next, we determine the initial position of the object. To do so:
[#1] Select the moment in the animation when the object appears.
[#2] We mark this location as the key point for the Object Position, with a change in value. In this case, we place the object minimally outside the left side of the screen from which it is to enter.
Krok 3
Making your animation dynamic
Animating object movement in Adobe Premiere Pro - step 2
In this way, we have given the object movement. It moves from the left to the middle of the screen. However, it is a uniform motion and thus simply boring…
In this step, we’ll show you how, with a few mouse movements and keyboard clicks, to give this movement a bit of dynamism. So that you can look at it better.
Bringing speed to the dynamics
Let’s start by changing the speed of the object’s entry into the screen. To do this:
[#1] Select both key points of the object and right-click on them.
[#2] From the drop-down list, select [Temporal Interpolation --> Beizer].
Changing the speed dynamics of an object in Adobe Premiere Pro - step 1
[#3] Then expand the Position options
[#4] and we can edit the logo using Beizer curves. In our case, we set the curve so that the speed is faster at the beginning of the entry and then slows down.
Changing the speed dynamics of an object in Adobe Premiere Pro - step 2
Object blur
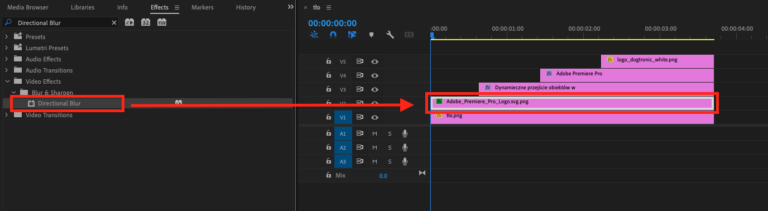
Another way to make our object more dynamic is to blur it when it enters the screen. There are several different effects available, but we will use the most intuitive and simplest one. We will add Directional Blur to the object. To do this we need to:
Locate the Directional Blur effect in the Effects window.
Add an effect to the object you are animating in the workspace.
Adding blur to an object in Adobe Premiere Pro - step 1
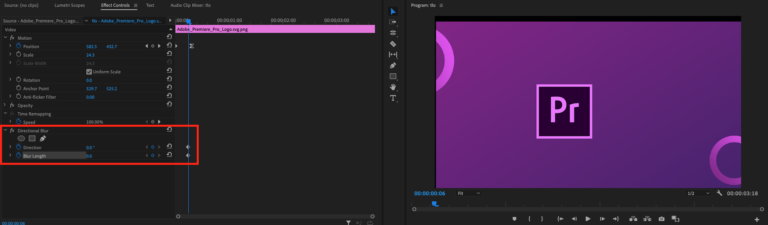
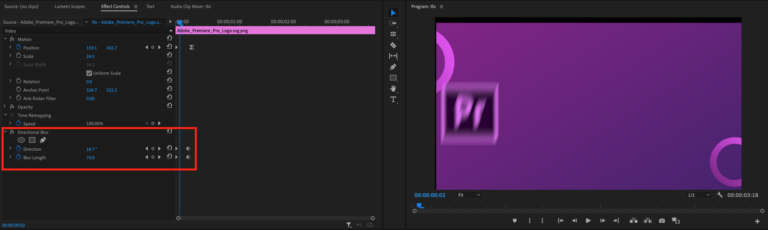
Next, in Effect Controls, set the key points for Direction, and Blur Length just before the object reaches its final position. Leave the values of both options set to zero.
Adding blur to an object in Adobe Premiere Pro - step 2
Finally, we add more key points for the blur effect at the beginning of the object and set the blur values and direction that are appropriate for us.
By applying the above effects, the object, instead of entering the screen in a static way, behaves more dynamically and keeps the eye on the animation. For the rest of the objects, simply apply analogous effects in different directions and values to best match our design.
Adding blur to an object in Adobe Premiere Pro - step 3
Summary
Applying the described effects takes a few minutes and gives an easy to get effect, which can be used in various kinds of projects. In the future you can expect more tutorials and tips for use in graphics and video editing programs.