WatermelonDB in React Native (1/2)
Choosing a local database is a common issue while creating online mobile applications
In this blog post I’ll try to explain practical side of working with such a database, by creating a simple To Do application using React Native framework and WatermelonDB database.
WatermalonDB is a library based on SQLite created especially for React/ReactNative which adds a number of interesting tools, as well as provides good performance.
One of the most interesting features is possibility to define sets of data, whose change can trigger re-rendering of the view.
New project
First we need to setup our environment. You can learn how to do it under this link: https://reactnative.dev/docs/environment-setup.
Then it the terminal, after entering a suitable folder, we can create a new ReactNative project using the following command:
react-native init ToDoAppWatermelonDB installation
The next step of the configuration is to install the database system. To install required libraries execute following commands:
yarn add @nozbe/watermelondb
yarn add @nozbe/with-observables
yarn add --dev @babel/plugin-proposal-decorators
After that we need to create a .babelrc configuration file, which enables usage of decorators in JavaScript code
{
  "presets": ["module:metro-react-native-babel-preset"],
  "plugins": [
    ["@babel/plugin-proposal-decorators", { "legacy": true }]
  ]
}
iOS configuration
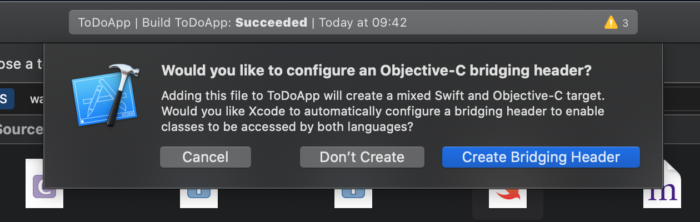
To properly configure the library on iOS, we need to open Xcode and create a .swift file (the name of the file does not matter) in the main folder of the app. After creating the file we should choose Create Bridging Header from the pop up.
As of today CocoaPods are not supported, so we’ll have to import the library manually
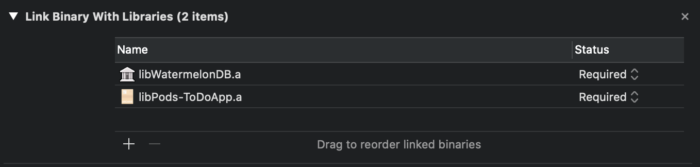
In Xcode’s side panel we have to choose Libraries folder of our main project, click on it with right mouse button and choose Add Files option. After finding node_modules/@nozbe/watermelondb/native/iOS/WatermelonDB.xcodeproj we can add project reference
Next we need to enter the Build Phases section (from the side panel). In Link Binary With Libraries tab we shall add a new element named libWatermelonDB.a.
Android configuration
Since WatermelonDB has issues with Android autolinking, we need to help it by making following modifications:
android/settings.gradle:
include ':watermelondb'
project(':watermelondb').projectDir =
    new File(rootProject.projectDir, '../node_modules/@nozbe/watermelondb/native/android')
android/app/build.gradle:
apply plugin: "com.android.application"
apply plugin: 'kotlin-android'

...

dependencies {
  ...
  implementation project(':watermelondb')
}
android/build.gradle:
buildscript {
  ext.kotlin_version = '1.3.21'

  ...

  dependencies {
    ...
    classpath "org.jetbrains.kotlin:kotlin-gradle-plugin:$kotlin_version"
  }
}
android/app/src/main/java/com/todoapp/MainApplication.java:
...

import com.nozbe.watermelondb.WatermelonDBPackage;

...

@Override protected List<ReactPackage> getPackages() {
  return Arrays.<ReactPackage>asList( new MainReactPackage(), new WatermelonDBPackage());
}
Now the configuration is done, and we can proceed with creating the database
Database configuration
Our goal now is to prepare a schema that will include all information essential for the application.
To better structurize our project, we should create a folder inside the main projects folder called database which will contain all the files regarding database and models.
Database schema
First we must create a file that will contain code responsible for the database schema. Let’s call it schema.js. The file should contain the following code:
import {appSchema, tableSchema} from '@nozbe/watermelondb';

export const mySchema = appSchema({
  version: 1,
  tables: [],
});
In the table that is the value of the tables field, we will define the schema of the database tables. In our application (as the name To Do suggests), we will be working on tasks. Therefore, we need to create an appropriate table that will store information about them. So in this table, let’s add:
tableSchema({
  name: 'tasks',
  columns: [
    {name: 'name', type: 'string'},
    {name: 'completed', type: 'boolean'},
  ],
}),
Our table will contain two columns: name and execution status. When creating them, you will also need to specify the data type.
Column types
Each column can have one of three types: string, number and boolean. If we allow a field to be optional by setting isOptional: true, then the field can also contain null value.
Provider preparation
To access the database from within the application, we need to configure the so-called Provider. To do this, we will modify the App.js file located in the main directory of the project.
At first, let’s import the necessary library methods:
import {Database} from '@nozbe/watermelondb';
import DatabaseProvider from '@nozbe/watermelondb/DatabaseProvider';
import SQLiteAdapter from '@nozbe/watermelondb/adapters/sqlite';
As I mentioned earlier, WatermelonDB is a library that runs over SQLite. Therefore, let’s add an appropriate adapter:
import {mySchema} from './database/schema';

...

const adapter = new SQLiteAdapter({
  schema: mySchema,
});
The mySchema schema here is our table schema created above. Next, we move on to initializing the database itself:
const database = new Database({
  adapter,
  modelClasses: [],
  actionsEnabled: true,
});
In the modelClasses field, we’ll be putting the model of our task in a moment. Before we do that, though, let’s take a look at the main App.js class:
export default class App extends Component {
  render = () => {
    return (
      <DatabaseProvider database={database}>
        <SafeAreaView style={styles.container}>
          {/* ... */}
        </SafeAreaView>
      </DatabaseProvider>
    );
  };
}
By using the DataProvider component, we have the ability to refer to the database from within all children of the component.
Model of the task
A schema definition is not a model definition. The main object that we will operate on in our application is Task, so we need to create its model (class definition). In the database directory, let’s add a new file named Task.js.
import {Model} from '@nozbe/watermelondb';

export default class Task extends Model {
  static table = 'tasks';
}
Next, let’s add the appropriate attributes. The names in the field correspond to the column name of the table created earlier.
import {field} from '@nozbe/watermelondb/decorators';

...

@field('name') name;
@field('completed') completed;
The entire file looks like this:
import {Model} from '@nozbe/watermelondb';
import {field} from '@nozbe/watermelondb/decorators';

export default class Task extends Model {
  static table = 'tasks';

  @field('name') name;
  @field('completed') completed;
}
Let’s return to the App.js file. At the database definition, we added a modelClasses field that contained an empty array. Let’s add the above created Task model as its element:
import Task from './database/Task';

...

const database = new Database({
  adapter,
  modelClasses: [Task],
  actionsEnabled: true,
});
To check if everything is working as expected, we can run the application using the command:
react-native run-iosIf the library has been correctly installed and linked, and the configuration has been done correctly, you should see a white background on the screen and no error.
Summary
In the first part of this post, we looked at the process of configuring the WatermelonDB library and creating table and model definitions. However, to get to the heart of the application in the next part, we will look at creating an application view and operating on the data in the database.
Adam Gałęcki
Digital Marketing Specialist | I create content and run SEO campaigns on a daily basis.